


![]()
GPS Tracking
The Routing view shows the sequence of Job Route ‘Legs’ for Employees, Equipment and/or Subcontractors for a specified day. A Leg is classified as the starting point to their destination point.
Route Planning uses Google Maps (as default) in the default Web Browser to help efficiently schedule Jobs and provide directions to employees.
![]()
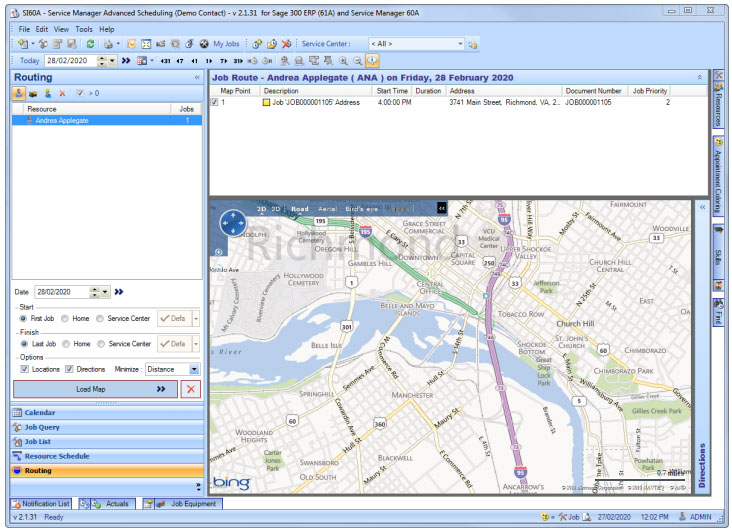
Bing Maps can be assigned as the Default Mapping method by changing the settings in the Routing Tab of the Tools > Options Window. Bing Maps uses the Routing View to display their Map and will not open in a separate Web Browser window.
![]()
Routing View consists of the following elements:
1. Navigation Pane – Provides the Routing display options
The toolbar at the top of the Navigation Pane consists of:
![]()
Below the toolbar is the display resources window, the date finder, start and finish point options, option check boxes for Job Locations and Directions as well as the Load Map and Clear Map buttons.
Addresses including Resource’s home addresses must be valid, entered accurately and recognized by Google or Bing Maps for the Home Start and Finish options to work appropriately. Invalid addresses will show as an error within the error list.
If the Employee and Subcontractor settings do not contain Service Centers than the Service Center options will not be enabled.
2. Job Route List – Details the selected resources’ Legs involved in carrying out their scheduled Jobs for the chosen day.
The columns displayed in this list are Map Point, Description, Address and Start Time. Columns in this list are configurable and can be widened or shrunk.
Double clicking on a Job within the Job Route List will open the Day Calendar where editing the appointment can occur to amend appointments and reschedule times and resources.
Steps to Route a Resource
The steps required to Route a Resource Type are:
- Select Routing
- Select a Date to view.
- Select a Resource Type to Route (employee). Hover over Employee, Equipment, Subcontractor icons. Select X to clear list at any time.
- Select an employee to see jobs for that day for that employee.Note addresses must be valid or Routing will error.
- Toggle off any jobs that will be excluded from the Route.Shift + Left Mouse or arrow keys to Paint more than one job. Right click to set check or uncheck entries.
- There several ways to start and finish the route Directions.
- Start from First Job, Home Or Services Center.
- End from Last Job, Home, Or Service Center.
- Check Directions to include directions in the Route.
- Select Load Map to load the Map.
- The Map will be displayed in the default Web Browser.